
 While hollowing out the region of the seat, I realized that I had exposed the floor at an area where the finboxes would lie. So before proceeding to do anything else inside the boat, I wanted to put the fin boxes in.
I again used the waveski as a model for finbox placement, and also read some other documents about where to place the finboxes and how various positions effect performance.
I put in a three fin thruster configuration using two 8" finboxes for the thruster fins, and one 10" finbox for the center. The centerpoint of the thruster finboxes is at the rear end of the seat position, as is the center finbox's leading edge. The thrusters are toed in slightly (pointing toward a point just off the bow) but not cambered out.
After marking the position of the fins, I routed out the bottom. First I set the router depth to just the fiberglass, and then took out the foam. I continued taking off just a little bit around the edges until the finboxes fit in with about 1 mm clearance around the edges.
I then cut three pieces of cloth per fin box large enough that when the fin box was pushed down into the hole over the cloth, that some stood up all the way around about an inch. Then masked off the bottom around the finboxes (right to the edge of the holes). And also put some wood in the fin slots of the boxes and taped off the rest of the finbox opening to prevent any resin from getting in.
Then with some microballoon epoxy mixture, I painted the inside of the holes, wetted out the glass, and painted the finboxes. After placing the cloth over the holes, I pushed each finbox in, with a slow steady rocking motion letting epoxy goosh up around the edges until the finboxes were just about flush with the deck or a little higher.
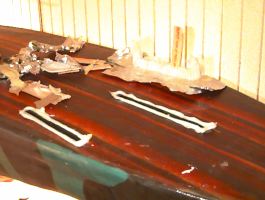
When cured you have a big mess sticking out from the bottom of the boat. Carefully using an automotive grinder I brought the finboxes and surounding glass to near flush with the deck, and then sanded down the rest of the way.
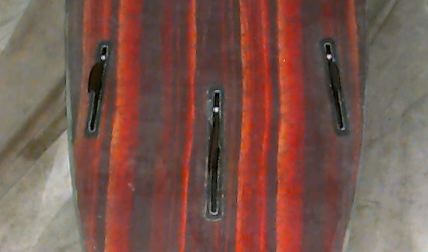
Final Finboxes
After the resin started to gell, I trimmed the glass along the top of the tubing, and noticed that the glass was sticking too much to the tubing (despite having been rubbed with parafin). Another minor crisis. So I gently peeled back the still soft glass and then inserted wax paper between the tubing and glass and folded it back as best I could. This ended up working OK. Another problem was that the cockpit rim had pulled away slightly from the edge of the hole leaving a gap in places. This I filled with microballoon mixture with a tukey baster. I used the sureform to remove the rough edges of the rim, and taped off the raw fiberglass while I continued to work on other parts of the boat.
Later I strengthened the rim with some strips of leftover 4oz S Glass that I had from the bottom. I would place the strip on tin foil wrapped onto a flat surface, and then put a dollop of resin on the strip and wet it out (the flat foil surface makes it real easy to wet out) and then pick up the strip and place it along the rim. This felt a lot like working with paper mache.